Jul 122010
 

OK, stop groaning over the title of this post.  It’ll probably be the best pun you read until you flick over to a slightly wittier SQL blog.

I’ve recently been upgrading an application from SQL Server 2000 to SQL Server 2005, and analysing performance between the two.  A common technique with this application is to create reporting stored procedures that have many different parameters, and allow the user to enter as few, or as many as they like.  (And then the text strings get a ‘%’ attached at each end, and thrown to a LIKE operation.)

For example, consider the following stored procedure:

USE AdventureWorks2008
GO

CREATE PROCEDURE dbo.TestOR 
      @PersonType nchar(2)
    , @FirstName nvarchar(50)
    , @LastName nvarchar(50)
AS
    SELECT * 
    FROM Person.Person
    WHERE (PersonType = @PersonType OR @PersonType IS NULL)
        AND (FirstName = @FirstName OR @FirstName IS NULL)
        AND (LastName = @LastName OR @LastName IS NULL)
GO

EXEC dbo.TestOR @PersonType = 'EM', @FirstName = null, @LastName = null
EXEC dbo.TestOR @PersonType = 'EM', @FirstName = 'Rob', @LastName = null
EXEC dbo.TestOR @PersonType = null, @FirstName = null, @LastName = 'Caron'
GO

You can see that the driving force here is the pattern (FirstName = @FirstName OR @FirstName IS NULL).  This means that if you do not supply a value for @FirstName (or set it to NULL), then the second part of the OR will always return TRUE, and so all rows will be selected, cancelling out the need for first part.

This appears to be a very good method of creating a single stored procedure that can flexibly take many different parameters.  It probably performed quite well in development too, until the amount of data increased.

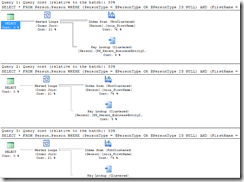
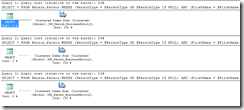
Let’s have a look at the execution plan:

image

Oh dear.  Table scans.  This example is only using a single table, but you can imagine what would happen if search parameters could be in multiple tables.

An additional problem with this method is that of parameter sniffing – if the query is initially run with a LastName only, then the execution plan will be optimised for a LastName – and this may not be appropriate for the next execution.  This can be demonstrated by running “EXEC sp_recompile dbo.TestOR”, and then running query #3, then #2, then #1.  The execution plans are the same for all three, but the plan has changed, as a different index has been used:

image

There are a few ways to fix this.  One is to create a different path for each combination of variables that are optional.  However, this rapidly becomes unwieldy – for this example, we would need nine different paths, all with very similar code!

Another option is to move to dynamic SQL:

CREATE PROCEDURE dbo.TestDynamic
      @PersonType nchar(2)
    , @FirstName nvarchar(50)
    , @LastName nvarchar(50)
AS
    DECLARE @sql nvarchar(max)
    DECLARE @params nvarchar(max)
    SET @sql = 'SELECT * 
                FROM Person.Person
                WHERE (1=1) ' 
    IF @PersonType IS NOT NULL 
        SET @sql = @sql + ' AND PersonType = @PersonType '
    IF @FirstName IS NOT NULL 
        SET @sql = @sql + ' AND FirstName = @FirstName '
    IF @LastName IS NOT NULL 
        SET @sql = @sql + ' AND LastName = @LastName '

    SET @params = '@PersonType nchar(2), @FirstName nvarchar(50), @LastName nvarchar(50)'
    
    EXEC sp_executesql @sql, @params, @PersonType = @PersonType
              , @FirstName = @FirstName, @LastName = @LastName
GO

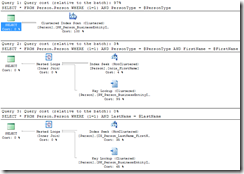
Let’s have a look at the new execution plans:

image

Much better!  We now have three different execution plans, and three different SQL statements being executed.

There are a number of benefits to switching to dynamic SQL in this case:

  1. The query is simpler.  This means that the query plans are likely to be more stable – there is less change of a bad plan being generated.
  2. Each combination of parameters will get its own execution plan, and this will be stored in the cache – in this case, we could have nine different plans.
  3. The code is easier to maintain.  It’s a little harder to read, but you only have a single copy of the query – it’s just built up along the way.
  4. The users still get to have their flexible interface – very important when the upgrade is supposed to change as few things as possible, functionality-wise.
Jul 082010
 

A common myth is that the LocalSystem account has no access to networked resources, and so you may have trouble getting SQL Server to backup to remote locations.

Excusing the fact that running SQL Server or IIS as LocalSystem is not a best practice, it is still possible to connect to networked resources. This is done by the domain account DOMAIN\ComputerName$. For example, if my server SQL01 was on the COMPANY domain, there will be an account in Active Directory named COMPANY\SQL01$. Whenever a service running as LocalSystem attempts to connect remotely, it will attempt to use this account. The restriction is that the server must be in a domain – a workgroup will not cut it.

A recent example of where this came in handy recently was an IIS installation that called Crystal Reports, which ran using System DSNs to connect to the database. These DSNs were configured to use a SQL login with no password. This worked quite well, until the security was tightened, and the SQL login was to be given a password. This then caused every report using the DSN to prompt the user for a password, as System DSNs cannot store passwords. Possible solutions were to change all 100+ reports to File DSNs (and protect them well, as the password would be stored in plain text inside the DSN). Alternatively, the System DSN could be modified to log in using Windows Authentication.

As IIS was running as LocalSystem, the initial attempt was to change this to be a domain account. Unfortunately, however, many security issues appeared, particularly with some versions of Internet Explorer. Allowing the DOMAIN\ServerName$ account limited access to the database removed the reliance on the insecure SQL login, and avoided a lot of rework.

As mentioned earlier, it is a better practice to use a dedicated domain account, but this technique may be useful in a pinch.

Jul 072010
 

While looking for a detailed explanation of cache-store flush messages in the SQL Server ERRORLOG, I came across this page: http://blogs.msdn.com/b/sqlprogrammability/archive/2007/01/17/10-0-plan-cache-flush.aspx, which refers to dropping a database causing the procedure cache to be flushed.

As someone that occasionally creates separate databases to hold temporary data, or a subset of an entire database, I did some investigations.

Script 1:

SELECT * FROM sys.dm_os_memory_cache_counters
WHERE name in ('Object Plans', 'SQL Plans', 'Bound Trees')
SELECT * FROM sys.dm_exec_cached_plans

This code simply reports on the state of the procedure cache at the server level.

Script 2:

CREATE DATABASE TestDB
GO
DROP DATABASE TestDB
GO
SELECT * FROM sys.dm_os_memory_cache_counters
WHERE name in ('Object Plans', 'SQL Plans', 'Bound Trees')
SELECT * FROM sys.dm_exec_cached_plans

We create a database, drop it, and then execute the queries from Script 1.

Conveniently, I have two development instances (2005 and 2008) with detailed plan caches that I have no problems with potentially flushing.  In SQL Server 2005, we get the following:

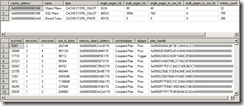
Before (Script 1):

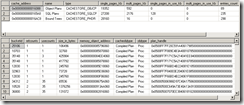
image

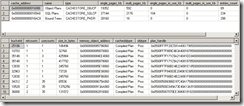
After (Script 2):

image

As (unfortunately) expected, the procedure cache is gone.  Now let’s try SQL Server 2008:

Before:

image

After:

image

No change!  Fantastic! The obvious conclusion is that you can drop or detach databases as much as you like in SQL Server 2008, but you may want to be aware of the potential effect you have on the server when using 2005.

Jul 052010
 

It is a common practice to rebuild indexes frequently in order to improve SQL Server performance.  The problem with rebuilding indexes is that you need to have space inside the data file to hold the index currently being rebuilt.  This means that a 5 GB index will require an additional 5 GB of space.  The subsequent problem here is that when the operation is over, the database will appear to have 5 GB of free space, and the DBA might decide to shrink the database (a bad idea, as this will re-fragment the data file).

A potential solution, for those building non-clustered indexes offline, is to first disable the non-clustered index.  A disabled index is akin to dropping the index, but keeping the index definition. After an index is disabled, it must be rebuilt before it can be used, as SQL Server has no way of knowing how many, or which, rows were inserted, updated, or deleted during the period the index was disabled.

This means that a 5 GB index can be rebuilt in place, using the same 5 GB.  The operation may be a little bit slower, and temporary space (either in TempDB or the current database) will be needed to re-sort the index (rather than base it off the current “live” copy of the index, as there is none), but it removes the requirement for the data file to have enough empty space to hold a second copy of the index.

Note that this only applies to non-clustered indexes, as disabling a clustered index will result in the entire table being unavailable, and all non-clustered indexes disabled. Ideally, clustered indexes will be based on a small ever-increasing clustered key, which will greatly reduce the need to ever de-fragment the non-clustered indexes (although there are cases, for example when the row is initially inserted very small (due to variable length columns), and then later updated to populate the variable length columns, widening the row and causing it to not fit on the existing page, forcing a page split).

While this may be a useful technique to avoid data file growth, I would worry about an environment that does not have sufficient working room to rebuild the largest non-clustered index.

Example:

IF EXISTS (SELECT * FROM sys.databases WHERE name = 'IndexRebuildTest')
    USE MASTER
    DROP DATABASE IndexRebuildTest
GO
CREATE DATABASE IndexRebuildTest
GO
USE IndexRebuildTest
GO

-- Force the transaction log to grow
ALTER DATABASE [IndexRebuildTest] MODIFY FILE ( NAME = N'IndexRebuildTest_log'
     , SIZE = 51200KB )
GO

CREATE TABLE t1 (
      i int IDENTITY
    , UniqueID UNIQUEIDENTIFIER DEFAULT newid()
    , c CHAR(1000)
    , CONSTRAINT pk_t1 PRIMARY KEY (i)
)
GO
CREATE UNIQUE NONCLUSTERED INDEX ncix_UniqueID ON t1(UniqueID) INCLUDE (c)
GO

SET NOCOUNT ON
GO

INSERT INTO t1 DEFAULT VALUES
GO 10000

-- Note that sp_spaceused reports the database size including transaction log.
EXEC sp_spaceused @updateusage = N'TRUE'

image

We have an 80 MB database –  but 50 MB of that is the transaction log.  The data is about 12 MB, and the index is 18 MB – quite a large, fragmented index!

ALTER INDEX ncix_UniqueID ON t1 REBUILD WITH (SORT_IN_TEMPDB = ON)
GO
EXEC sp_spaceused @updateusage = N'TRUE'

image

Now, our database has grown to 91 MB – an increase of 11 MB.  We’ve also experienced a shrinking in the size of the index due to the rebuild, saving 6 MB.

Let’s run the first listing again (to reset the database size back to 80 MB), and then try disabling the index first.  Note that the 18 MB currently being taken by the index is immediately released when the index is disabled.

ALTER INDEX ncix_UniqueID ON t1 DISABLE
GO
ALTER INDEX ncix_UniqueID ON t1 REBUILD WITH (SORT_IN_TEMPDB = ON)
GO
EXEC sp_spaceused @updateusage = N'TRUE'

image

There you have it.  The database is still 80MB (it fluctuates slightly, depending on how fragmented in the index is each time we reset the database), and there is 6 MB of unallocated space – which is the savings from de-fragmenting the index.

Again, this primarily only useful for rebuilding offline – the index will be unavailable while it’s disabled.  If you do have 2005/2008 Enterprise Edition, you could rebuild online and at least have the table available during the rebuild, but the index will not be.  (And if you do have Enterprise Edition, forking out another $2000 for extra disk space won’t be an issue!)

Jun 302010
 

Often while I’m in the bathroom, getting ready for work, my two year old son will wander in, and start playing with stuff he finds lying around.  Often, he’ll pick up a little can of hairspray, and attempt to rub it under his arms as though it were deodorant. Highly cute, and highly amusing, but with potentially devastating consequences if he ever figures out how to take the cap off. 

Over the past year, I, and a few others have discovered a similar circumstance with Management Studio.  Very occasionally, say, once every 6 months, Management Studio will confuse the hairspray and deodorant, with potentially devastating consequences.

The situation is that on three occasions in the past year, I have opened a new window, usually with Control-N, and then used the “Change Connection” (right click, “Connection”, “Change Connection…”) option to switch to a different server.  The first time I did this, I was flicking between a test server and a production server to compare data in both environments to determine the differences.  The problem arose when the data in both servers looked identical.  Am I going crazy?  I just proved that the data was different.  What?  Eventually I ran SELECT @@SERVERNAME on both windows, and discovered that both windows were on the production server even though the “test” window was displaying the name of the test server in the status bar, and the tab name.  SSMS was reporting that I had changed the connection from production to test, but @@SERVERNAME did not agree.  Scary.

It occurred again today, again, while I was comparing differences in data between two environments.  It only appears to occur when using “Change Connection” when opening new windows.  Jason Jarret discovered a reproduction for this issue a while back.

There is a Connect item available, but until then, I recommend the following, especially if you’re about to truncate tables on a test system:

  1. If changing to a different server, wait a period of time before changing the connection, just to let the new window finish loading.  And before running anything that could modify the database, double-check your connection.
  2. Alternatively, only ever use Control-N to get a new window for the server you’re connected to.  If you need a window on the other box, select it in the Object Explorer and click “New Query”.

It’s only a twice-a-year kind of bug, but I don’t want it to pop up on me when I’m dropping tables from test. 

Although I’m sure that a good dose of hairspray under the arms could make for some very interesting styles!  I’m just glad that I don’t have Management Studio barging in on me while I’m in the bathroom.

Oct 062009
 

I’ve been fairly busy recently, and I’m likely to stay that way.  Following on from this event, my second son Dashiell was born today.  More pictures will follow separately for those that are interested (Hi Mum!), but rest assured that he looks almost identical to Lachlan.

For those of you that are looking for a SQL-bent to this post, you can consider Dash a logged shipped version of Lachlan, with a latency of 20 months, except his DBAs know what they’re doing this time around.  In another 20 months, they’ll form an active-active cluster and my life will be even more hectic :)

image

Sep 042009
 

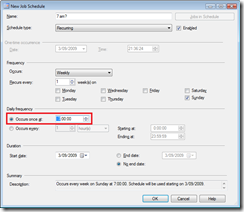
I recently came across a situation at a client’s site where I was unable to choose whether a SQL Agent schedule would be AM or PM.  Here’s a screenshot:

image

There is no AM/PM option, and clicking in the area of the control where it should be does nothing.  The first part – the hour – only goes from 1 to 12.  This means it’s only possible to schedule the job to run between midnight and 11:59:59am.

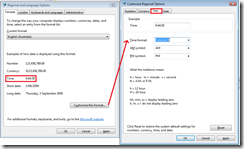
The cause of the problem was in the Standard Operating Environment settings for the organisation, where their default regional settings have the time set to h:mm:ss.  This displays times in 12-hour (instead of 24 hour), and does not display an AM/PM symbol.  This can be solved by changing the regional settings (via the Regional Settings Control Panel) time format on the computer to H:mm:ss (24 hour, no AM/PM) or h:mm:ss tt (12 hour, with AM/PM).  After this is done, reopen the schedule dialog box, and all is well. 

image

This is an issue with both Management Studio 2005 and 2008, running on Windows XP, Vista and Server 2003, but I think it’s rare that the regional settings will be configured in such a way.

Sep 022009
 

(Updated due to noeldr’s comment being a better option)

We all know that SELECT * is frowned upon when writing queries, but some tables have lots of columns that you don’t want to type out all the column names for.  What’s the fastest way of getting a column list?

I used to script out the CREATE statement for the table, and then remove any extra square brackets and types.  This had a lot of editing associated with it, which is relieved with Management Studio 2008 which provides the “SELECT TOP 1000 Rows” when right clicking on the table.  This still provides square brackets, however.  Other options were to put the results into text mode, and copy the header line.  However, the fastest method I’ve found is using the Query Designer, which I’ve never had use for. Another option is to use the Query Designer, which I still have no use for.

To get a list of columns for a table, create a SELECT * statement for it:

USE AdventureWorks
GO
SELECT * FROM Production.Product

Next, highlight the SELECT statement, and press Control-Shift-Q or use the menu item “Design Query in Editor…” under the “Query” menu to bring up the Query Designer:

image

Select or deselect the columns you don’t want, and copy the list to the clipboard.  That’s it!

Noeldr’s option, from the comments below is even better, and works in either Management Studio or Query Analyzer.  Simply open the Object Explorer up to the table, expand the table so that the “Columns” node is visible, and drag this item from the Object Explorer into your query window.  I love how you can work with a product for years and still find little tips like this!

Are there any other easy options I’ve missed, or should I always use square brackets when using column names?  Let me know!

Aug 312009
 

When is an index scan not a scan?  When it’s a seek!

Consider the following query:

USE AdventureWorks
GO
SELECT * FROM Production.TransactionHistory

As there is no filter on the table, you would expect to see an index scan.  Turn on the Actual Execution Plan, and SET STATISTICS IO ON, and have a look at the results:

image

(113443 row(s) affected)
Table 'TransactionHistory'. Scan count 1, logical reads 792, 
physical reads 0, read-ahead reads 0, lob logical reads 0, 
lob physical reads 0, lob read-ahead reads 0.

Just as expected.  Let’s now consider the following query:

SELECT * FROM Production.TransactionHistory WHERE TransactionID >= 1
(113443 row(s) affected)
Table 'TransactionHistory'. Scan count 1, logical reads 792, 
physical reads 0, read-ahead reads 0, lob logical reads 0, 
lob physical reads 0, lob read-ahead reads 0.

image 

The query returns the same set of rows, and has identical performance, but shows up in the execution plan as a seek!

The take-home message here is that just because you can see an index seek in your query does not mean that performance is great.  It means that the table was accessed using a filter you’ve placed on the query.  A lesser message, but sometimes overlooked is that a seek can “scan” a long range of values, if each of the values matches the filter.

Aug 272009
 

The Snapshot Isolation Level and Read Committed Snapshot features were a big improvement when SQL Server 2005 came out – finally, SQL Server had optimistic locking as well as pessimistic locking!  This is a feature that allows writers not to block readers, and readers will not block writers – instead, the readers will look at the most recent row, and ignore the fact that it’s currently being written to.  This sounds great on first inspection – long running transactions won’t block other transactions! If you accidentally have a BEGIN TRANSACTION but you haven’t followed up with a COMMIT or a ROLLBACK, other users won’t be blocked.

It recently came up in discussion that you can just turn on Read Committed Snapshot, and a lot of your blocking will be a thing of the past.  While this is true, I strongly discourage turning on Read Committed Snapshot for existing applications unless you know exactly how your application will respond to it.

Read Committed Snapshot is a modification to the Read Committed Isolation level that uses row versioning to read the previous value.  The trouble comes when you realise that Read Committed Snapshot is the default isolation level, and once you’ve turned it on, every single read committed transaction will run as a snapshot. 

If the developers of your application expect that Read Committed will be the default (back when they wrote the application when SQL Server 2000 was the latest version, this was a reasonable assumption), then changing Read Committed’s behaviour can have unintended consequences.

Let’s look at an example.  We’ll create a new database, containing a single table, Inventory.  This is a simple stock control system, and we’ll be looking at the procedure to check out an item. It’s worth noting that there are better and safer methods of writing the stock checkout function to not have this issue (such as using Repeatable Read), but it’s very possible that the developers of your application used something similar, and it worked “good enough”.

CREATE DATABASE ReadCommittedSnapshotTest
GO

USE ReadCommittedSnapshotTest
GO

CREATE TABLE Inventory (
      ItemID int NOT NULL 
    , LocationID int NOT NULL
    , Qty int
    , PRIMARY KEY (ItemID, LocationID)
)
CREATE NONCLUSTERED INDEX ncixLocationItem ON Inventory(LocationID, ItemID)
GO

Next, we’ll insert some data.

SET NOCOUNT ON
INSERT INTO Inventory (ItemID, LocationID, Qty)
VALUES(rand() * 1000 + 1, 1, rand() * 40 + 1)
INSERT INTO Inventory (ItemID, LocationID, Qty)
VALUES(rand() * 1000 + 1, 2, rand() * 40 + 1)
INSERT INTO Inventory (ItemID, LocationID, Qty)
VALUES(rand() * 1000 + 1, 3, rand() * 40 + 1)
GO 2000
-- Ignore any key violation errors - we'll still get enough data
INSERT INTO Inventory (ItemID, LocationID, Qty) VALUES (796, 1, 5)

For the next part, we need to run the following query on two separate sessions at the same time.  I’ve added a 10-second delay in processing the transaction – you can imagine that there may be other processing required to complete the checkout, and this may take a second or two.  Ten seconds is a little unrealistic, but provides enough time to run the query in the other window.

The way this transaction works is that we begin a transaction, and read the number of items that are in stock at the moment.  If there are more than we want to take, we update the Inventory.

BEGIN TRANSACTION
DECLARE @QtyRequired int, @QtyRemain int
SELECT @QtyRequired = 4
SELECT @QtyRemain = SUM(QTY) FROM Inventory WHERE ItemID = 796 AND LocationID = 1
IF @QtyRemain - @QtyRequired >= 0 
BEGIN
    UPDATE Inventory SET Qty = Qty - @QtyRequired
    WHERE ItemID = 796 AND LocationID = 1
    -- Do other stuff in other tables or databases to check out the item
    WAITFOR DELAY '00:00:10'
    SELECT 'Checkout complete'
END
ELSE
    SELECT 'Not enough qty!'
COMMIT TRANSACTION

SELECT * FROM Inventory WHERE ItemID = 796

If you run the two queries together, you’ll notice that both queries take about 10 seconds to run, and the one that ran first will report “Checkout complete”, and the other will report “Not enough qty!”.  This is good – the second query was blocked until the first was finished.

Let’s turn on READ COMMITTED SNAPSHOT and see what the effect will be.  First we’ll replace the items so we can run the same query again.

-- Replace the inventory
UPDATE Inventory SET Qty = 5 WHERE ItemID = 796 AND LocationID = 1

-- Turn on READ_COMMITTED_SNAPSHOT
ALTER DATABASE ReadCommittedSnapshotTest
SET READ_COMMITTED_SNAPSHOT ON
-- You may need to disconnect the other session for this to complete.

Run the two queries again, side by side.  This time, it still takes 10 seconds to run both queries, but the second query returns a –3 quantity.  Oh dear.

As mentioned, using Repeatable Read would help solve this issue, as you would be guaranteed the data wouldn’t change between the initial stock count check, and the update.  As the two queries are VERY close together, you may never see this issue with the code above, but it still can happen.  As I mentioned, this is an example of “good enough” code.  However, the difference is that the problem only has a narrow window of a few milliseconds to occur with READ COMMITTED, but has 10 seconds to occur with READ COMMITTED SNAPSHOT.

The conclusion of this example is that your application may have unexpected results if you blindly turn on READ COMMITTED SNAPSHOT.  It is a great feature of SQL Server 2005, but unless you know exactly what the effects will be, I don’t recommend turning it on for existing systems.