Sep 042009
 

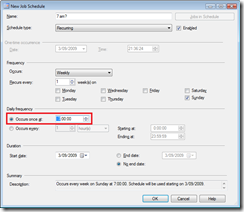
I recently came across a situation at a client’s site where I was unable to choose whether a SQL Agent schedule would be AM or PM.  Here’s a screenshot:

image

There is no AM/PM option, and clicking in the area of the control where it should be does nothing.  The first part – the hour – only goes from 1 to 12.  This means it’s only possible to schedule the job to run between midnight and 11:59:59am.

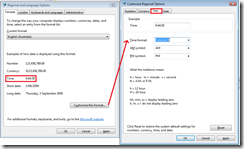
The cause of the problem was in the Standard Operating Environment settings for the organisation, where their default regional settings have the time set to h:mm:ss.  This displays times in 12-hour (instead of 24 hour), and does not display an AM/PM symbol.  This can be solved by changing the regional settings (via the Regional Settings Control Panel) time format on the computer to H:mm:ss (24 hour, no AM/PM) or h:mm:ss tt (12 hour, with AM/PM).  After this is done, reopen the schedule dialog box, and all is well. 

image

This is an issue with both Management Studio 2005 and 2008, running on Windows XP, Vista and Server 2003, but I think it’s rare that the regional settings will be configured in such a way.

Aug 312009
 

When is an index scan not a scan?  When it’s a seek!

Consider the following query:

USE AdventureWorks
GO
SELECT * FROM Production.TransactionHistory

As there is no filter on the table, you would expect to see an index scan.  Turn on the Actual Execution Plan, and SET STATISTICS IO ON, and have a look at the results:

image

(113443 row(s) affected)
Table 'TransactionHistory'. Scan count 1, logical reads 792, 
physical reads 0, read-ahead reads 0, lob logical reads 0, 
lob physical reads 0, lob read-ahead reads 0.

Just as expected.  Let’s now consider the following query:

SELECT * FROM Production.TransactionHistory WHERE TransactionID >= 1
(113443 row(s) affected)
Table 'TransactionHistory'. Scan count 1, logical reads 792, 
physical reads 0, read-ahead reads 0, lob logical reads 0, 
lob physical reads 0, lob read-ahead reads 0.

image 

The query returns the same set of rows, and has identical performance, but shows up in the execution plan as a seek!

The take-home message here is that just because you can see an index seek in your query does not mean that performance is great.  It means that the table was accessed using a filter you’ve placed on the query.  A lesser message, but sometimes overlooked is that a seek can “scan” a long range of values, if each of the values matches the filter.

Aug 272009
 

The Snapshot Isolation Level and Read Committed Snapshot features were a big improvement when SQL Server 2005 came out – finally, SQL Server had optimistic locking as well as pessimistic locking!  This is a feature that allows writers not to block readers, and readers will not block writers – instead, the readers will look at the most recent row, and ignore the fact that it’s currently being written to.  This sounds great on first inspection – long running transactions won’t block other transactions! If you accidentally have a BEGIN TRANSACTION but you haven’t followed up with a COMMIT or a ROLLBACK, other users won’t be blocked.

It recently came up in discussion that you can just turn on Read Committed Snapshot, and a lot of your blocking will be a thing of the past.  While this is true, I strongly discourage turning on Read Committed Snapshot for existing applications unless you know exactly how your application will respond to it.

Read Committed Snapshot is a modification to the Read Committed Isolation level that uses row versioning to read the previous value.  The trouble comes when you realise that Read Committed Snapshot is the default isolation level, and once you’ve turned it on, every single read committed transaction will run as a snapshot. 

If the developers of your application expect that Read Committed will be the default (back when they wrote the application when SQL Server 2000 was the latest version, this was a reasonable assumption), then changing Read Committed’s behaviour can have unintended consequences.

Let’s look at an example.  We’ll create a new database, containing a single table, Inventory.  This is a simple stock control system, and we’ll be looking at the procedure to check out an item. It’s worth noting that there are better and safer methods of writing the stock checkout function to not have this issue (such as using Repeatable Read), but it’s very possible that the developers of your application used something similar, and it worked “good enough”.

CREATE DATABASE ReadCommittedSnapshotTest
GO

USE ReadCommittedSnapshotTest
GO

CREATE TABLE Inventory (
      ItemID int NOT NULL 
    , LocationID int NOT NULL
    , Qty int
    , PRIMARY KEY (ItemID, LocationID)
)
CREATE NONCLUSTERED INDEX ncixLocationItem ON Inventory(LocationID, ItemID)
GO

Next, we’ll insert some data.

SET NOCOUNT ON
INSERT INTO Inventory (ItemID, LocationID, Qty)
VALUES(rand() * 1000 + 1, 1, rand() * 40 + 1)
INSERT INTO Inventory (ItemID, LocationID, Qty)
VALUES(rand() * 1000 + 1, 2, rand() * 40 + 1)
INSERT INTO Inventory (ItemID, LocationID, Qty)
VALUES(rand() * 1000 + 1, 3, rand() * 40 + 1)
GO 2000
-- Ignore any key violation errors - we'll still get enough data
INSERT INTO Inventory (ItemID, LocationID, Qty) VALUES (796, 1, 5)

For the next part, we need to run the following query on two separate sessions at the same time.  I’ve added a 10-second delay in processing the transaction – you can imagine that there may be other processing required to complete the checkout, and this may take a second or two.  Ten seconds is a little unrealistic, but provides enough time to run the query in the other window.

The way this transaction works is that we begin a transaction, and read the number of items that are in stock at the moment.  If there are more than we want to take, we update the Inventory.

BEGIN TRANSACTION
DECLARE @QtyRequired int, @QtyRemain int
SELECT @QtyRequired = 4
SELECT @QtyRemain = SUM(QTY) FROM Inventory WHERE ItemID = 796 AND LocationID = 1
IF @QtyRemain - @QtyRequired >= 0 
BEGIN
    UPDATE Inventory SET Qty = Qty - @QtyRequired
    WHERE ItemID = 796 AND LocationID = 1
    -- Do other stuff in other tables or databases to check out the item
    WAITFOR DELAY '00:00:10'
    SELECT 'Checkout complete'
END
ELSE
    SELECT 'Not enough qty!'
COMMIT TRANSACTION

SELECT * FROM Inventory WHERE ItemID = 796

If you run the two queries together, you’ll notice that both queries take about 10 seconds to run, and the one that ran first will report “Checkout complete”, and the other will report “Not enough qty!”.  This is good – the second query was blocked until the first was finished.

Let’s turn on READ COMMITTED SNAPSHOT and see what the effect will be.  First we’ll replace the items so we can run the same query again.

-- Replace the inventory
UPDATE Inventory SET Qty = 5 WHERE ItemID = 796 AND LocationID = 1

-- Turn on READ_COMMITTED_SNAPSHOT
ALTER DATABASE ReadCommittedSnapshotTest
SET READ_COMMITTED_SNAPSHOT ON
-- You may need to disconnect the other session for this to complete.

Run the two queries again, side by side.  This time, it still takes 10 seconds to run both queries, but the second query returns a –3 quantity.  Oh dear.

As mentioned, using Repeatable Read would help solve this issue, as you would be guaranteed the data wouldn’t change between the initial stock count check, and the update.  As the two queries are VERY close together, you may never see this issue with the code above, but it still can happen.  As I mentioned, this is an example of “good enough” code.  However, the difference is that the problem only has a narrow window of a few milliseconds to occur with READ COMMITTED, but has 10 seconds to occur with READ COMMITTED SNAPSHOT.

The conclusion of this example is that your application may have unexpected results if you blindly turn on READ COMMITTED SNAPSHOT.  It is a great feature of SQL Server 2005, but unless you know exactly what the effects will be, I don’t recommend turning it on for existing systems.

Jul 232009
 

When developing T-SQL code, I frequently have a number of stored procedures created and run inside one .sql file.  While I’m generally good at highlighting the single statement I want to run, there are some situations where the highlight is misplaced – usually by me getting complacent with the lack of lag on Remote Desktop.  Suddenly I’ll get a dose of lag, my highlight command (shift-uparrow) won’t be processed, but my Execute (F5) command will.

To defend against this, I determined that the best option would be to create a severe error at the top of the .sql file to ensure that execution would cease.  Unfortunately, this only stops the execution of the current batch, and as CREATE PROCEDURE must be at the start of the batch, I have many batches in my code.

Five minutes after requesting suggestions from Twitter, Rob Farley suggested using SQLCMD mode – which is a feature that I haven’t used very often.  This is activated in Management Studio via the “Query” | “SQLCMD Mode” menu item, and can be specified as the default mode for all new query windows.

Placing the following code at the top of the file results in a fatal error that completely halts execution:

:on error exit
SELECT * FROM SomeTableThatDoesntExist
GO

!!dir
GO

The !!dir command will list the contents of the current directory.  You can run this line by itself, but this line won’t be executed if you run the entire .sql file.

The drawback to this method is that you lose Intellisense in SQL Server 2008 and the ability to debug your code, but I’m willing to live with this to prevent having to comment out my more dangerous statements!

Apr 232009
 

In my previous post, I discussed how you can use the HashBytes() function to generate hashes.  I gave a couple of examples where you could use this for your benefit, but a follow-up post is necessary.

Just to recap, a hash is a one-way encryption of a set of data of any size to come up with a smaller (eg, 20 bytes for SHA1) that can almost-uniquely identify the original source.  It is NOT a compressed version of the source – you cannot reconstruct the original source with the hash.

The main reason for using hashes is to see if things have changed.  The MDx hashing algorithms (Message Digest) was originally used to determine if email or Usenet messages had been read.  Instead of sending all messages, you could receive the hashes, and then compare the list of hashes with what you have stored locally, and only download those that you are missing.

A similar use of hashes is used to protect the integrity of executable files available for download.  You can create a hash of the executable, and when the user has downloaded your file, they can re-generate the hash to ensure that nothing has changed it (for example, a virus latching onto the executable).  If the hashes do not match, you would be wary of running the program.

Back in the database world, here are three scenarios where you might like to use hashes:

  1. Password and authentication
  2. Data Integrity
  3. Detecting changes to a table

Passwords and authentication

If you have a website and you’ve rolled your own authentication system, one thing you do not want to do is store passwords in your database.  By running the password through a hashing algorithm, you can store the hash in your database.  When the user tries to log in, you simply hash the password entered, and compare the two hashes to see if they match.  This means that you can never recover the password – you can only reset the password.

This looks great from an initial glance, but has some drawbacks.  If you’ve used a standard hashing algorithm, and an attack can get a copy of the hashed password, it is possible to compare this hash with a known list of hashed passwords, or generate the hashes by brute force until the generated hash matches the hashed password.  Alternatively, if the attacker has write access to your table, they could insert the hash for a known password onto any account.

A way around this is to “salt” the password.  Salting involves adding extra information to the password before hashing, and this works well as long as the attacker does not know what the extra information is.  You could add the username to the password, or add “abcd!%*(&” to the end of the password, and then hash the result.  As long as you do this every time you generate your hash, a standard set of pre-hashed values will not match your system.  Once the attacker has seen your source code, however, they will know how your hashes have been salted.

Data integrity

Data Integrity is another useful feature you can create with hashing.  Imagine that you don’t want your database administrators to be able to update tables via Management Studio – you only want them to update the tables via a specific interface, whether by an encrypted stored procedure, or through your application.  You can create a hash column on your table, and create a hash based on the other columns.  For example, if you had a Student table:

CREATE TABLE Student (
      StudentID int NOT NULL IDENTITY PRIMARY KEY
    , FirstName varchar(25) NOT NULL
    , Surname varchar(25) NOT NULL
    , DateOfBirth datetime NOT NULL
    , EmergencyContactPhone varchar(15) NOT NULL
    , RowHash varchar(50)
)

Now, when you insert your Students, you need to supply a value for the RowHash:

INSERT INTO Student (FirstName, Surname, DateOfBirth
    , EmergencyContactPhone, RowHash)
VALUES ('Robert', 'Jackson', '1995-10-21', '+61399991234'
    , sys.fn_varbintohexstr(HashBytes('SHA1',
        'SALTRobertJackson1995-10-21+61399991234'))
)

As you can see, the hash is the word SALT plus the FirstName, Surname, DateOfBirth and EmergencyContactPhone concatenated together.  Note that if you have CONCATE_NULL_YIELDS_NULL turned off, you’ll end up with an empty string if you try to add a NULL value to a string.

The next step is to look at the data.  As we’re not encrypting the data, your DBA can happily look at the rows.  However, in your application, you want to check the hash every time you load in the row to see if it has been modified and the hash not updated correctly.  For example, to retrieve our Robert’s row:

SELECT
      FirstName, Surname, DateOfBirth
    , EmergencyContactPhone, RowHash
    , sys.fn_varbintohexstr(HashBytes('SHA1', 'SALT'
        + FirstName + Surname
        + CONVERT(varchar(10), DateOfBirth, 121)
        + EmergencyContactPhone)) AS GeneratedHash
FROM Student
WHERE StudentID = 1

We get the existing RowHash, and a GeneratedHash, which should match.  Note that you would only generate this new hash in an encrypted stored procedure, or in your application, otherwise your DBA can see how the hash is constructed and generate a hash for his changed data.

Let’s update the row without updating the hash, and rerun the select query (click the image for a bigger version):

UPDATE Student SET FirstName = 'Bob' WHERE StudentID = 1

image

Oh dear, the hashes don’t match.  Sound an alarm!

Detecting changes to a table

Another use for hashing is to detect changes over a large number of rows.  For example, if you have a Students table that also includes their year level, and you want to check monthly to see if new students have been added to that year, you can either have a Modified Date column to store when rows are modified, keep track of any changes via a trigger, or use a hash function.

Create a separate table to hold the hashed values:

CREATE TABLE MonthlyStudentHash (
      SampleDate datetime
    , YearLevel int
    , GroupHash varchar(50)
    , PRIMARY KEY (SampleDate, YearLevel)
)

Each month, we can run the following query to get a hashed version of the students:

INSERT INTO MonthlyStudentHash
SELECT GETDATE(), YearLevel
    , sys.fn_varbintohexstr(HashBytes('SHA1'
        , CONVERT(varchar(20), NumStudents * SumDateOfBirth )))
FROM (
    SELECT YearLevel
        , COUNT(*) AS NumStudents
        , SUM(CONVERT(int, DateOfBirth)) AS SumDateOfBirth
    FROM Student
    GROUP BY YearLevel
) years

In the inner query (years) we get all the students, and group them by year level, counting the number of students in the YearLevel, and adding together their dates of birth, converted to an integer.  In the outer query, we then multiply the number of students by the SumDateOfBirth and hash this.  No salting is necessary in this case.

The NumStudents * SumDateOfBirth doesn’t make any sense, but it can be whatever you like – the aim is to get a unique value that can be hashed.  (Actually, NumStudents * SumDateOfBirth is likely to be small enough that hashing it will just take up more space, but if you want more accuracy (uniqueness), you can concatenate all the students’ names together and hash that!)


Now, each month, run this query, and compare the current hash value to last month’s hash value.  It will be easy to see if there’s been a change.  This is a great solution if you have no power to modify the source table to add a ModifiedDate column.

Conclusion

There are plenty of other uses for hashed values – this article has only mentioned a few uses.  I’d love to hear any other ideas – please leave a comment!